https://www.facebook.com/FitMomAmandahttp://instagram.com/fitmomamandahttp://www.youtube.com/user/Amandanoddingshttps://plus.google.com/u/0/109635482394512718098/aboutamandanoddings@me.com
Showing posts with label Healthy Family Meals. Show all posts

Monday, August 6, 2018

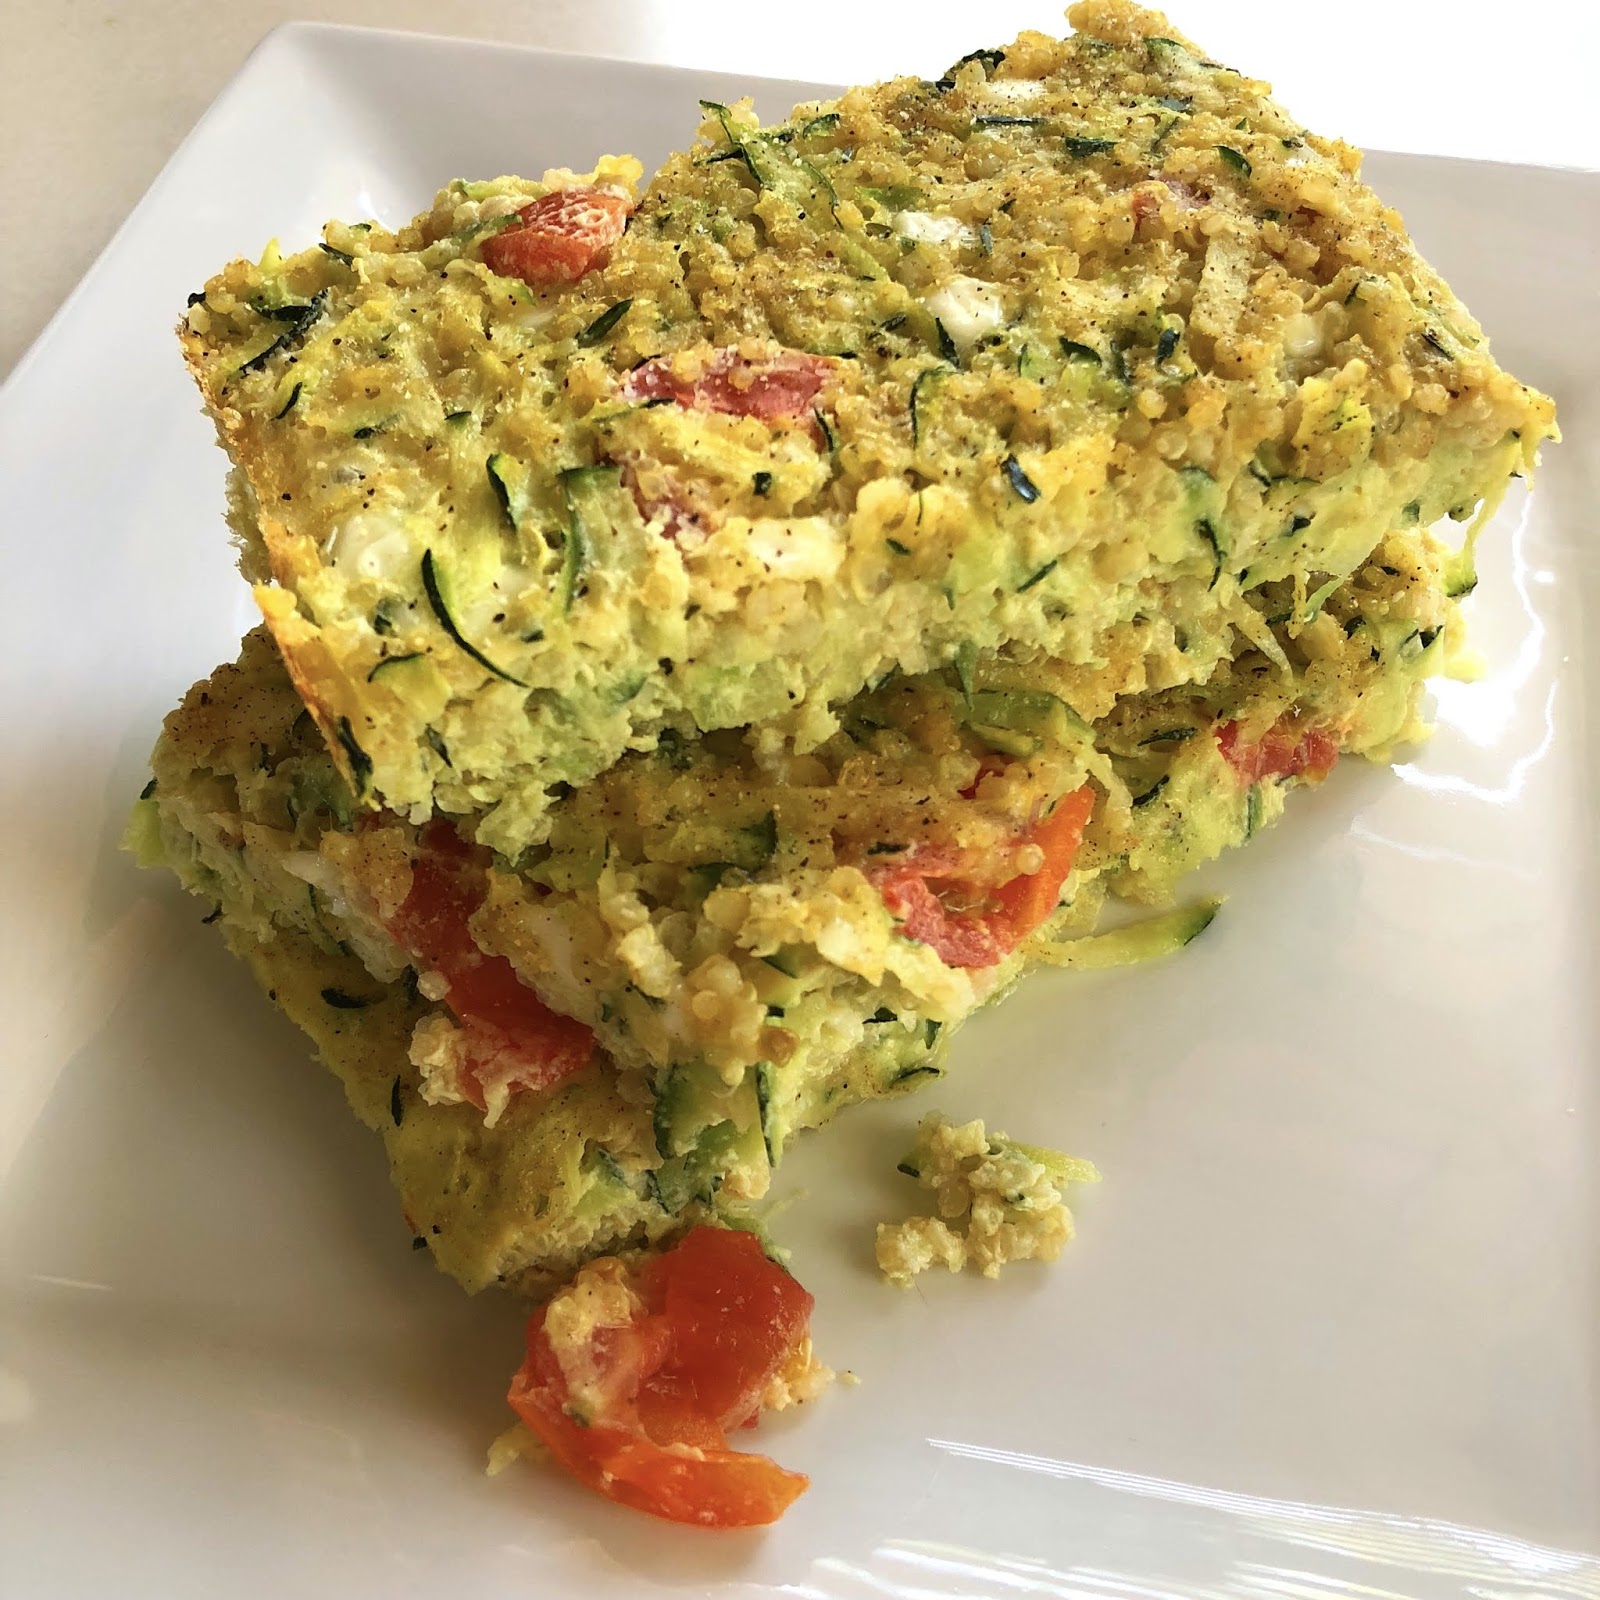
Family Meal: Quinoa Breakfast Bake


A few months ago, I made this simple breakfast casserole for the first time, and I can’t tell you how easy and yummy it was! Loaded with nutrition (one batch serves 5 and comes out to 272 calories, 12F, 24C, and 18P if you're one of those crazy people that counts calories!), or if you follow the simple nutrition plan that I used to lose all my weight (and still follow today!), it counts as 1 red, 1 yellow, and 1 green. Simple. :)

Today I made a spin-off, but today instead of utilizing the 4 cups of spinach the recipe called for, I substituted 4 cups of shredded zucchini since I have an abundance from our garden! I also chose cottage cheese instead of ricotta, and the taste was just as yummy. What a cheap, easy, and equally nutritious substitute! Play around with this recipe or try your own substitutes, and let me know what you think!

Here's what you need:

  • 2½ cups cooked quinoa 
  • 8 large eggs, lightly beaten 
  • ¾ cup part-skim ricotta 
  • 4 cups raw spinach 
  • 1 cup cherry tomatoes, halved 
  • ½ cup finely chopped basil 
  • 1 tsp. garlic powder 
  • 1/2 tsp. Himalayan salt
  • 1/2 tsp. ground black pepper 

Here's what you do:
Preheat your oven to 375° and lightly coat a 9x12-inch baking dish with spray and set it aside. In a large bowl, combine quinoa, eggs, cottage cheese, spinach, tomatoes, and basil in a large bowl; mix well. Season with salt and pepper, if desired. It will be a thick mixture, but that’s how it’s supposed to be! The eggs will cook up. :)

 Pour your quinoa mixture into baking dish (I evenly spread mine with a rubber spatula). Bake for 20 to 25 minutes, or until a toothpick inserted into the center comes out clean. Cut your casserole into 5 equal sized pieces and BAM! You have a family breakfast that’s easy, healthy, AND tastes good! If you try this recipe, I hope you’ll reach out and let me know what you think! I love hearing from you!

As always, live healthy, live happy. Love, Amanda

Friday, April 27, 2018

Summer Family Favorite! Clean Pasta Salad


Tonight we did one of my favorite things of spring: our first family barbecue of the season! As an outdoor lover, there’s nothing better than combing my love of nature with two of my other passions: family and FOOD.

We all know that barbecue isn’t something that is traditionally associated with healthy eating. As a woman who has also struggled with her weight, I am very conscientious of what I put on my family table when it comes to dinner time. However, as a stubborn and determined woman who fought her way out of morbid obesity through clean eating and proper portions, I refuse to sacrifice enjoying flavorful meals.

Enter this easy, healthy pasta salad. Did you say PASTA!? Yes, pasta! My life is about balance, not restriction; living more, not less. That means making healthy choices when it comes to what type of pasta you choose, as well as having a reasonable portion size when you serve it up.

For this recipe, I used a whole grain rotini pasta easily found in your local grocery store. I’m also a big fan of brown rice noodles and quinoa pasta as well. Here’s what you’ll need to make the base of this pasta side dish, perfect alongside a lean protein for that summer barbecue dinner.

4 cups of cooked whole grain pasta
4 cups chopped fresh spinach
2 cups chopped cherry/heirloom tomatoes
1/2 can chopped black olives
1/4 cups chopped fresh parsley

After you mix those together in a bowl, you can toss in 1/4 cup of a light Italian dressing. Here’s one of my favorites if you want to make a batch from scratch. I love to make up a few different flavors and store it in a mason jar in the fridge to use on salads and wraps. Just because it’s clean doesn’t mean it has to be bland!

Here’s how to make a batch of this amazing Greek vinaigrette dressing:
8 T extra virgin olive oil
4 T red wine vinegar
4 T Dijon mustard
1/8 c. chopped oregano
1 T minced garlic
2 Pinches of pink Himalayan sea salt
Squeeze of fresh lemon juice

I’d love to hear what you think of these recipes and tips if you try them out. As always, if you need help on your fitness journey, I always have online support and challenge groups running! Just reach out! Live healthy, live happy, Amanda

Sunday, August 13, 2017

Grilled Chicken Dijon

I'm always looking for recipes that meet my most important criteria: Easy. Fast. Clean. And dammit, they'd better taste good, too. And guess what? This one hits them all. Start to finish, this yummy dinner will only cost you a total of 15 minutes. Here's what you'll need to serve 2:
  • 1 clove garlic, crushed 
  • 2 tsp. Dijon mustard 
  • 6 fresh parsley sprigs (or thyme, marjoram, or rosemary), finely chopped 
  • 1 dash sea salt (or Himalayan salt) 
  • ½ tsp. ground black pepper 
  • 1 Tbsp olive oil 
  • 2 (4-oz.) each raw chicken breasts, boneless, skinless
PROTIP: Double (or more!) this recipe and have extra servings for a big family, or even leftovers for work. This reheats great! I also made amazing honey dijon chicken wraps with the leftovers for my husband's work lunch. Try it out, and don't be afraid to get creative!

The secret to this quick preparation is using the broil function on your oven- but take it from someone who knows, and make sure not to leave the room! Just a few extra minutes on a high broil, and we are talking chicken hockey-pucks. :P  So step one, turn that broiler on! Step two is to prepare your dijon glaze.


In a bowl, mix your garlic, mustard, parsley, salt, pepper, and olive oil. Now, in my case, I went with a coarse ground mustard, so mine is not as much of a marinade as a paste-- and I LIKE it that way! Yours can be more or less dense, depending on your ingredients and individual tastes. Spoon or brush your chicken breasts evenly with the mustard-garlic mixture.

PROTIP: I like to use a lightly coated piece of foil to line my baking sheet, simply to minimize cleanup.


Your next step? Grill (or broil) chicken for 5 minutes on each side, or until chicken is no longer pink in the middle. As with all poultry, you want an internal temperature of 165 degrees (salmonella is not your friend!). So keep an eye on that timer or thermometer, and stay close. In just a few minutes, you'll have a meal of tangy deliciousness.

All that's left is to pick your side! I tend to consume any carbs I have earlier in the day, so my body can utilize them for energy, as they are intended! So for me, dinner usually looks like this: protein + vegetable. For our meal, we went with some green beans to offset this yummy centerpiece. 5 minutes, of prep, 10 minutes to cook, 1 happy family.

In my challenge groups, I focus on giving you the tools to be successful with your meal plan, not only during the group but for life! we want lasting lifestyle changes-- and that doesn't mean starving or eating foods that don't taste good! We share recipes like this, along with motivation and support as we work through some amazing workouts. Want to join us? Message me! I have a group starting soon!


And one more thing I know you're wondering-- the NUTRITION! Now, if you know me, you know I don't calories, i follow the portion fix containers that make it easy for me to know how much of what to eat. If you follow that plan, you're looking at one red and 1 1/2 teaspoons per serving. Not too shabby! And if you aren't doing that plan, here's the old fashioned info: 
  • Calories: 199 
  • Total Fat: 10g 
  • Carbohydrates: 2g 
  • Protein: 24g
Perfect if you are following a ketogenic diet, a low carb lifestyle, or just plain like good food! And if you decide to make it, let me know what you think-- I'd love to hear from you! And if you're looking for support on your fitness journey, reach out. I'm here! As always, live healthy, live happy. Love, Amanda 


Friday, November 11, 2016

Hummus Crusted Chicken


Tasty? Healthy? Easy? ✅✅✅ CHECK! I love this recipe! It takes less than 25 minutes to cook (only about 3 minutes to prepare!), and the whole family enjoys it. It reheats beautifully and the leftovers are super versatile (think wraps, quesadillas, and more). Give it a try and let me know what you think! 

You will need: 
4 4-6ounce Chicken breasts
1/2 cup hummus
1/2 lemon 
Cracked pepper
Rosemary/parsley for garnish


Preheat oven to 450 degrees. Line baking sheet with foil and lightly spray with non-stick cooking spray. place 4 chicken breasts cut to equal size for even cooking on pan. Squeeze lemon juice over all 4. 


Spread hummus on top and sides. Sprinkle Rosemary, parsley, fresh cracked pepper, and a dash of sea salt. Bake for 25-30 minutes (I remove it from the oven when the internal temp hits 160). That's it! Let it rest... then serve with your choice of veggie- to keep it simple and easy, I grab a steamer bag of veggies out of the freezer (busy mom pro-tip. :)

If you follow my meal plans (which of course you SHOULD!), this will count as: 1 Red, 1 green, 1/2 blue per serving. 
 Do you need support on your fitness journey? I would love to help you! Simply send me a message! I hope you'll subscribe and share this if it helped you. As always, live healthy, live happy! Love, Amanda


Friday, August 26, 2016

Parmesean Zucchini Bake


A lot of things went wrong in my crazy house today, but one thing that went amazingly right was this side dish. It's simple, delicious, only takes a few ingredients, and my kids not only helped make it, but they gobbled it up! The only problem I had with this recipe is when I took it to work, my coworkers tentatively took tastes... And then ate almost all of my dish! Try this out next time you need to get some veggies in with dinner. You might be surprised who eats it!

Here's what you need:
  • 4 Zucchini quartered lengthwise
  • Lemon (zest and wedges)
  • 1/2 Cup shredded Parmesan cheese
  • 1/2 tsp dried thyme leaves
  • 1/2 tsp dried oregano leaves
  • Sea salt and ground pepper to taste
  • Garlic, finely chopped (I used minced garlic)
  • 1 T Olive Oil


First, preheat your oven to 350°.  Combine your cheese, lemon peel, thyme, oregano, salt, pepper and garlic in small bowl and mix well. You'll want to wash your zucchini and have it sliced lengthwise. Place it skin side down on large baking dish. Now, here was a great job for my 5 year old: I let her brush all the zucchini with olive oil and then sprinkle the cheese mixture on top. 

Pro tip: Make sure you supervise this step closely or you'll most likely have a giant pile of cheese in the middle of your pan! ;)

That's it! Now, you simply bake for 15 - 20 minutes or until they're nice and tender (poke with a fork), or a little longer if you want some crisp. You can garnish with lemon wedges, or like me, thin slice them right on top before baking for a little extra kick. My 3 year old son loved getting to have the "important job" of placing the lemon slices.
PROTIP: If you're a crazy busy mama like me, after brushing the zucchini with olive oil (you can mix a dab of lemon juice in instead of zest), grab your pre-blended Italian herb blend and sprinkle it on, then the cheese. It's just as good and twice as simple!

I truly hope you enjoyed this recipe. It's clean, simple, easy, and delicious- all my favorite things in one dish! For the 21 Day Fix (the clean eating nutrition plan I used to help myself lose 95 pounds and keep it off!), this entire dish serves four, with each serving counting as 2 greens, 1/2 a blue, and a teaspoon! If you want to learn more about that program, message me, email me here, or order it here!
 
Please share this recipe with your friends and loved ones who may enjoy it, and as always, love healthy, live happy! 
Love, Amanda
As always, I hope you enjoy this recipe, and let me know what you think


Tuesday, August 9, 2016

A Healthy Kicken' Chicken Salad


I really love the chicken salad wraps and sandwiches from Arby's, but although they brand them as healthy, they simply aren't. They are chock-full of mayo and unhealthy sugar and fat that you don't really need in your healthy diet. One thing that has helped be be successful with my clean-eating lifestyle, not only losing 95 pounds but KEEPING it off, is finding ways to make these favorite recipes in a way that actually is good for me and that y whole family enjoys. This way, I never feel like I'm missing out. This chicken salad is my own version, inspired by Autumn Calabrese' recipe from the Fixate cookbook. **If you haven't heard of that cookbook but want to get your hands on your own copy, you can find it here.**

I always start my week by prepping chicken breast in the oven. It saves me time and money throughout the week, and I can use it in various recipes.


Here's what you'll need to make my version of this delicious salad, with the 21 Day Fix Container equivalents also:
  • 1 Cup Chopped Celery (1 Green)
  • 1 Cup Chopped Red Seedless Grapes (1 Purple)
  • 1 Cup Chopped Apple (1 Purple)
  • 1 1/2 Cups Chopped Chicken Breast (Bake your own like I did or buy a rotisserie chicken and shred it to save time!)


For the dressing part, you'll need:
  • 3 T Rice or Red Wine Vinegar
  • 1 T Local Raw Honey
  • 3 T Dijon or Stone Ground Mustard
  • 1 1/2 Cups Plain Greek Yogurt (2 Reds)
Take a few minutes to prep your ingredients and chop them up.


I wait until I'm ready to use the chicken to chop it up. This prevents it from drying out in the fridge. :)


This is really so simple. First, mix your dressing base together in a bowl (yogurt, vinegar, honey, and mustard). You can add salt and pepper to taste.

Once you've done this, dump all your chopped ingredients on top!


Fold, or gently mix your ingredients together in the bowl. That's it! You now have your Creamy Chicken Salad!


If you divide this entire bowl into two portions, it will count as 1 Purple, 1 Green, 2 Reds, and 1/2 an orange on the 21 Day Fix Plan. Yes, that's a HUGE amount of salad! I personally broke it up over 2 meals at work. Questions? Just ask!


I love to use this on whole grain wraps, but you can also place it on whole grain bread to make a sandwich, or even put it on crispy lettuce bibs to avoid the carbs!

I hope you enjoy this recipe, and your family loves it as much as I do. Please comment on this post if you have any questions, and share this recipe with those you think will want to try it! As always, I'm here for you if you need help and support on your fitness journey. Live healthy, live happy! Love, Amanda


Saturday, February 20, 2016

Quick Clean Chicken Cacciatore


I can't tell you exactly what a cacciatore is, because- well, I'm French-Canadian, not Italian. :) But I can tell you what I look for in a new recipe: I want it to be easy and not overly time consuming, full of clean (or mostly-clean) ingredients, and taste delicious (passing the husband-kid test).

An added bonus if it's easy to double or makes multiple portions. I want it to stretch into more than one meal so I can take it to work at night at the hospital, AND feed my family at home at the same time.

This awesome recipe from the Team BeachBody Blog fits the bill in every one of those categories. It was especially fun to photograph as I made it, due to the vibrant colors of the amazing vegetables. It's also easily made vegetarian, simply by substituting tofu for (or leaving out) the chicken. I hope you'll give it a try and let me know what you thought! Here's what you'll need:


Ingredients:
1 Tbsp. olive oil
1 lb. raw chicken breasts, boneless, skinless, cut into 1-inch pieces
1 medium onion, thinly sliced
1 medium celery stalk, sliced
1 clove garlic, finely chopped
1 medium red bell pepper, cut into 1-inch pieces
8 oz. sliced mushrooms
1 (14.5 oz.) can whole tomatoes
1½ tsp. dried basil, crushed
Ground black pepper (to taste; optional)
2 medium zucchini, sliced
1 medium eggplant, peeled, cut into 1-inch cubes (you can substitute 2 more zucchini if you don't feel like eggplant)
6 fresh parsley sprigs, finely chopped (for garnish, optional)


Preparation:
1. Heat oil in large nonstick skillet over medium high heat.

2. Add chicken; cook, stirring frequently, for 3 to 4 minutes, or until lightly browned. Tip: Make sure you have it on medium high or your chicken will cook too slowly and also be more dry!


***You'll spend about ten minutes prepping if you chop this all at once and about 20 minutes cooking, start to finish. :) ***


3. Add onion, celery, garlic, bell pepper, and mushrooms. Cook, stirring occasionally, for 4 to 5 minutes or until onion begins to soften.


4. Add tomatoes, basil, and pepper; cook, stirring occasionally, for 5 to 6 minutes. This is easy, right?


5. Add zucchini and eggplant; cook, stirring occasionally, for 5 to 6 minutes, or until chicken is no longer pink in the middle, and juices run clear. Tip: Never be afraid to pull out that thermometer (165 for poultry) or better yet, cut a piece in half and make sure there's no pink!

6. Garnish with parsley if desired. Trust me, you do. It not only gives it a little wow factor, but it adds a good counterbalance of flavor.


Tip: Chicken Cacciatore can be served over brown rice or whole wheat pasta. Add a yellow for the container of whole grains- I personally used my favorite quinoa blend from Costco and it was amazing, adding a nutty crunch and texture!


This recipe is good for four portions, each serving is 2 greens and 1 red on the container system I use to keep my eating healthy and proportioned. To get your hands on it, go here, or email me any time with questions! So, I simply divided it into 4 Tupperware containers and had myself 4 ready to eat meals to take to work over the next few nights. I love simple!


If you don't know me yet, my name is Amanda Noddings, and I am a busy mother of two who works full time in Nursing. I am also a Star Diamond Beachbody Coach. Through my own journey to lose over 90 pounds and fight depression after the loss of my baby, I have revived my life with a new purpose for helping others and a passion for health and fitness!


To contact me about joining Team Driven, having Free coaching and support, or getting started with a program and achieving your health and fitness goals, fill out this quick contact form and I'll get back to you ASAP:
http://tinyurl.com/teamdrivencoach

Check out my like page, www.facebook.com/TeamDrivenFitness for recipes, motivation, and more, and don’t forget to subscribe to me here!

Star Diamond Coach Amanda Noddings
Www.facebook.com/TeamDrivenFitness
Www.facebook.com/FitMomAmanda
Www.youtube.com/amandanoddings

Tuesday, January 26, 2016

Healthy Veggie and Egg Breakfast Muffins: 21 Day Fix Approved!


I love these little muffins for so many reasons.
*They are perfectly portioned to help me stay on track.
*They are easy and convenient to grab and go when I'm short on time!
*They are chock-full of veggies and protein.
*They freeze well for later!
*My kids love them, too (who doesn't like a muffin?)!

This recipe makes 12 egg cups and you can eat 2 muffins per serving, so this is enough for 6 servings. I personally doubled this recipe in order to make a full tray of a dozen muffins. Here's what you'll need:

Ingredients:

* One dozen large eggs
* 12 ounces Baby Spinach, finely chopped
* 1 red bell pepper, chopped
* 1 green bell pepper, finely chopped
* 1/2 a red onion, finely diced
* Sea Salt and fresh cracked pepper (to taste)


Here's what you do:


1. Preheat your oven to 375° F.


2. Lightly coat your muffin tin with a nonstick coating (I use coconut oil, but a nonstick olive oil spray will work too). I do not feel cupcake liners work well for this recipe.


3. Place eggs in a large bowl and whisk/beat until scrambled well. Although I often substitute egg whites in recipes, I feel the healthy fat from the yolk of the egg is necessary here, not only for them to rise well but also to release from the pan.


4. Add in your chopped veggies and seasonings and whisk away again.


5. Use a 1/3 cup measuring cup and start distributing between the muffin tin, one scoop at a time per muffin. This way, you will have everything evenly split between cups, as the veggies have a tendency to sink to the bottom. Continue until all are evenly filled.


6. Bake for approx. 15-20 minutes at 375° or until toothpick inserted into the center of cups comes out clean.


7. Here is where a I think people fail on this one. The first thing to do is be patient, and let them cool about 5 minutes. As soon as they are set, I use a plastic fork or knife (not metal, you'll ruin your nonstick pan!) to peel them away from the edges in a circular stroke. After that, the fork can pop them up from the bottom pretty easily!


You can store these in the refrigerator and heat them up in a microwave when you are ready to eat, or freeze them and reheat them (but trust me, with my kids eating them too, they don't last that long!). You can easily have 4 of these muffins (and count it as 2 reds and 2 greens) to start your day right!

Remember, you can eat 2 muffins per serving! Each serving is 1 green and 1 red container on the BeachBody portion controlled container system, most popularly known as the 21 Day Fix nutrition plan. I am currently following this same plan with the all new workout, The Masters: Hammer and Chisel, and it has been a HUGE component of maintaining my 95 pound weight loss.


If you ever want to learn more about this system, I adore it and am happy to answer any of your questions. Simply shoot me an email at amandanoddings@me.com or hit me up on Facebook!

I hope you enjoy this recipe, and share it with your fit friends and family as you get closer to your own health and fitness goals. Be sure to subscribe to the blog to be notified every time I post a recipe! Or check out my videos on YouTube.com and see my gorgeous face in person. ;) And as always, live healthy, live happy. Love, Amanda


Star Diamond Coach Amanda Noddings
Www.facebook.com/TeamDrivenFitness
Www.facebook.com/FitMomAmanda

Sunday, September 27, 2015

Perfect Pumpkin Protein Pancakes


It's fall, an pumpkin spice is every where! Pumpkin lattes, pumpkin doughnuts... But what about something you can make at home, that the whole family will enjoy? That fresh baked pumpkin smell fills the house when you grill up these homemade pumpkin pancakes. And the bonus? They'll get your day off to a healthy start packed with the protein and carbs you need to be at your best.  
Here's what you're looking at for ingredients:

Wet: 
 -3/4 c. Pumpkin Purée
 -6 Egg Whites 
 -1/8 c. Unsweetened Cashew Milk 
 -1 T. Pure Vanilla Extract

Dry ingredients: 
 -2/3 c. Oat Flour 
 -1 Scoop Vanilla Shakeology
 -1/2 tsp. Baking Powder
 - 1 tsp. Cinnamon
 -1/2 tsp. Nutmeg

This recipe calls for Oat Flour. I didn't have any on hand, but what I did have were these organic quick-cook steel cut oats I love by Bob's Red Mill. I took one cup of oats and pulsed it in my Vitamix until it had the powdery consistency of flour. Whalah! Oat flour. Why would I use this instead of regular flour? For starters, it's gluten free, if you're into that. But also, oats are a heart healthy whole grain, with fiber to move you along. ;)

The way to make these is so simple, my 5 year old daughter helped me throw them together. I preheated my stove to a little below medium (a 4 out of 10), and lightly sprayed my pan with nonstick olive oil. Grab your nearest spoon, fork, or child, and stir the dry ingredients together. Next, mix the wet. Then combine. That's it! I told you these were simple! 

Next, pour the batter! After about 2 minutes (the key is to wait until you see the edges begin to "lift" from the pan), you flip and wait 2 more minutes. Then repeat. 
We decided to have a little fun at Olivia's request, and drizzle some dark chocolate on top of our stack of pancakes. You could do the same, add some walnuts, or even a tablespoon of maple syrup to add a little sweetness. If you really love that pumpkin flavor, go ahead and add a teaspoon of pumpkin pie spice to the mix to kick the pumpkin up a notch. 


Will you try these out? Share with a friend! Don't forget to subscribe to never miss a recipe, or Pin it for later! Who doesn't need a great healthy whole grain breakfast for the whole family this fall?
🎃🎃🎃🎃🎃🎃🎃🎃🎃🎃🎃🎃

Star Diamond Coach Amanda Noddings
www.youtube.com/amandanoddings


Star Diamond Coach Amanda Noddings
Www.facebook.com/TeamDrivenFitness
Www.facebook.com/FitMomAmanda